Butterfinger Pie with Peanut Butter Recipe
Introduction
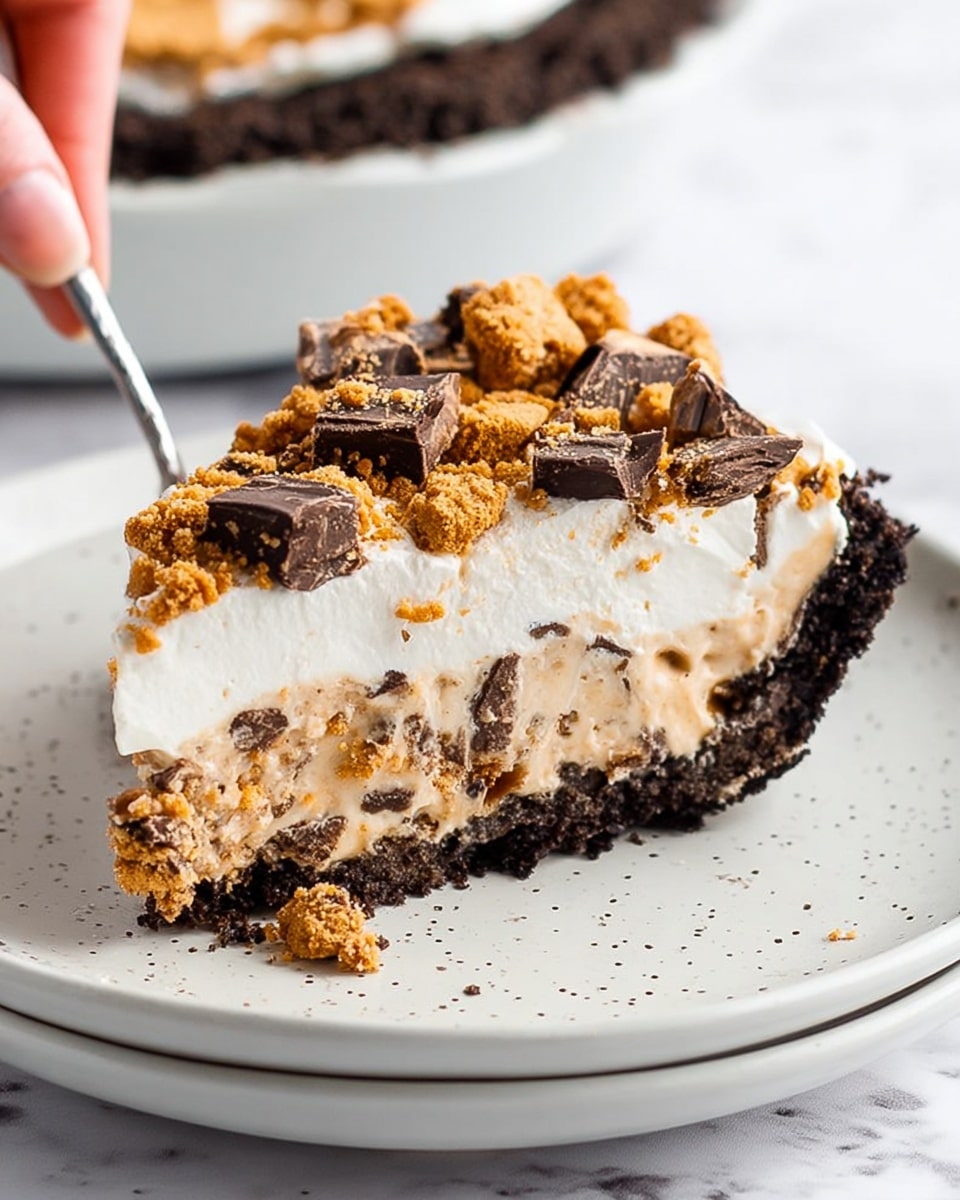
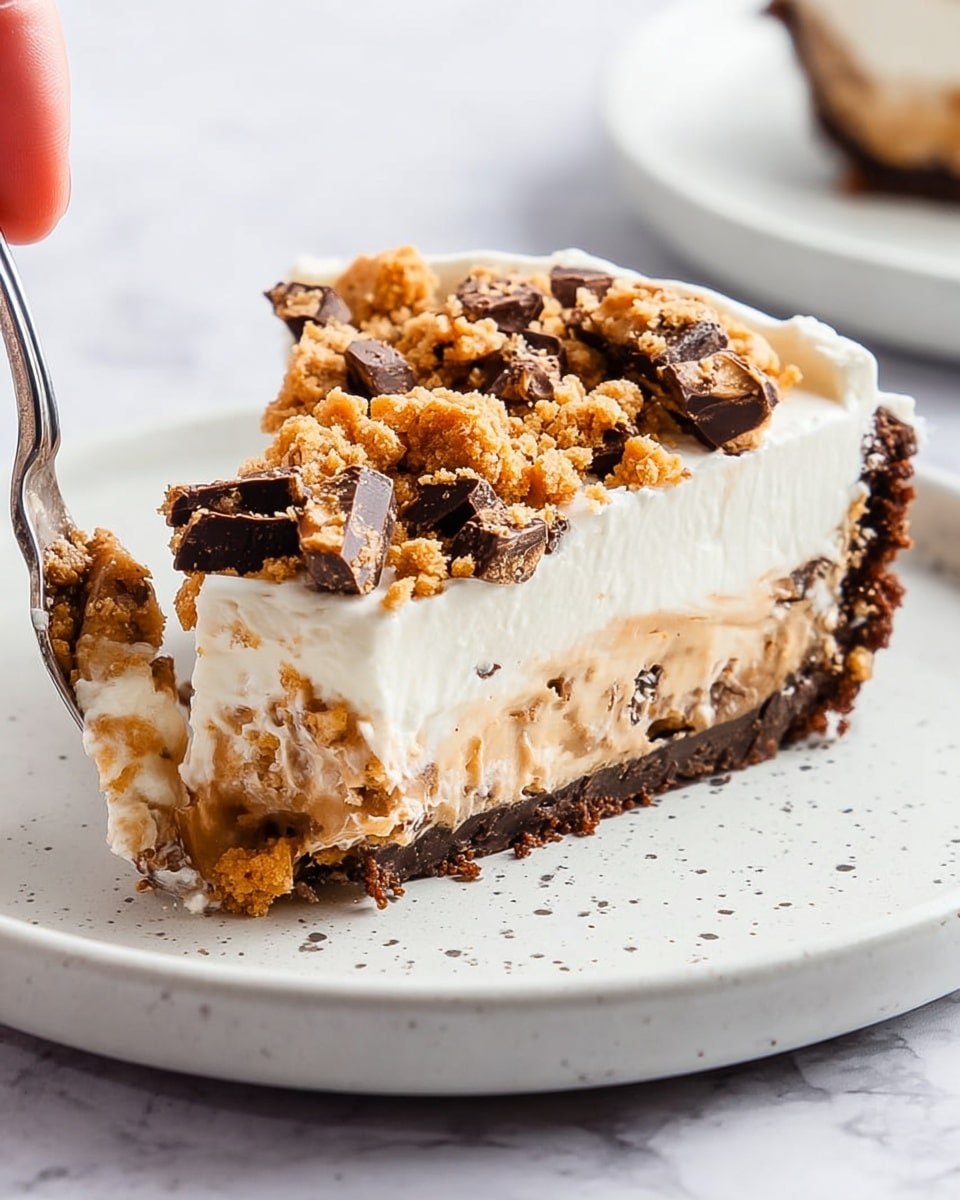
This Butterfinger Peanut Butter Pie is a dreamy, no-bake dessert that beautifully combines creamy peanut butter with the crunchy sweetness of Butterfinger candy bars. Perfect for any occasion, it’s a crowd-pleaser that’s rich, indulgent, and surprisingly easy to make.
Ingredients
- 2 cups graham cracker crumbs (or crushed Oreos for a chocolate twist)
- ½ cup unsalted butter, melted
- 1 cup creamy peanut butter
- 8 oz cream cheese, softened
- 1 cup powdered sugar
- 1 tsp vanilla extract
- 8 oz whipped topping (like Cool Whip), thawed
- 4 Butterfinger candy bars (2.1 oz each), crushed (plus extra for topping)
Instructions
- Step 1: In a medium bowl, mix the graham cracker crumbs with melted butter until well combined. Press the mixture firmly into the bottom and up the sides of a 9-inch pie dish. Refrigerate while you prepare the filling.
- Step 2: In a large bowl, beat together the peanut butter and softened cream cheese until smooth, about 2 minutes. Add powdered sugar and vanilla extract, mixing until creamy and well combined, about 1-2 minutes more.
- Step 3: Gently fold the whipped topping into the peanut butter mixture until just combined. Be careful not to overmix to keep the filling light and fluffy.
- Step 4: Crush 3 Butterfinger bars (save one for topping) and fold them into the peanut butter filling evenly.
- Step 5: Pour the filling into the prepared crust, smoothing the top with a spatula.
- Step 6: Crush the remaining Butterfinger bar and sprinkle it evenly over the top of the pie.
- Step 7: Refrigerate the pie for at least 4 hours or overnight to allow it to set properly.
- Step 8: When ready to serve, slice the pie and enjoy. For clean slices, dip your knife in hot water and wipe it dry between cuts.
Tips & Variations
- Make sure your cream cheese is fully softened to avoid lumps in the filling.
- Crush Butterfinger bars by placing them in a zip-top bag and using a rolling pin—it’s an easy and even method.
- For a beautiful presentation, pipe swirls of whipped cream around the pie edge before adding extra Butterfinger pieces.
- This pie can be made up to 2 days in advance; keep it covered in the refrigerator.
- Variation: Drizzle warm chocolate ganache on top for extra decadence.
- Variation: Substitute Butterfinger bars with Reese’s Cups for a peanut butter cup twist.
- Variation: Add a layer of vanilla pudding between the crust and filling to create a layered pie.
- Variation: Make mini pies in a muffin tin for individual servings.
Storage
Store the pie covered in the refrigerator for up to 2 days. To reheat slightly, let it sit at room temperature for 10 minutes before serving, but it’s best enjoyed chilled. Avoid freezing, as the texture may change.
How to Serve
Serve this delicious recipe with your favorite sides.
FAQs
Can I use crunchy peanut butter instead of creamy?
Yes, you can use crunchy peanut butter for added texture, but the filling may be less smooth. For the classic creamy texture, creamy peanut butter is recommended.
Can I make this pie ahead of time?
Absolutely! This pie can be made up to 2 days in advance. Just keep it covered and refrigerated until ready to serve.
PrintButterfinger Pie with Peanut Butter Recipe

This Butterfinger Peanut Butter Pie is a luscious no-bake dessert featuring a creamy peanut butter and cream cheese filling with whipped topping, set on a buttery graham cracker crust, and loaded with crunchy, crushed Butterfinger candy bars throughout and on top. Perfect for parties or an indulgent treat, it blends creamy, sweet, and crunchy textures in every bite.
- Prep Time: 30 minutes
- Cook Time: 0 minutes
- Total Time: 4 hours 30 minutes
- Yield: 8 servings 1x
- Category: Dessert
- Method: No-Cook
- Cuisine: American
Ingredients
Crust
- 2 cups graham cracker crumbs
- ½ cup (1 stick) unsalted butter, melted
Filling
- 1 cup creamy peanut butter
- 8 oz cream cheese, softened
- 1 cup powdered sugar
- 1 tsp vanilla extract
- 8 oz whipped topping (like Cool Whip), thawed
- 4 Butterfinger candy bars (2.1 oz each), crushed (plus extra for topping)
Instructions
- Prepare the crust: In a medium bowl, combine the graham cracker crumbs and melted butter until evenly moistened. Press the mixture firmly into the bottom and up the sides of a 9-inch pie dish. Place the crust in the refrigerator to chill while you make the filling.
- Make the filling: In a large bowl, beat the peanut butter and softened cream cheese together until smooth and creamy, about 2 minutes using an electric mixer. Add the powdered sugar and vanilla extract and continue mixing for another 1-2 minutes until fully incorporated and smooth.
- Fold in whipped topping: Gently fold the whipped topping into the peanut butter mixture, taking care not to overmix, until just combined to maintain a light texture.
- Add Butterfinger pieces: Crush 3 Butterfinger bars finely and fold them into the peanut butter filling, distributing evenly.
- Assemble the pie: Pour the filling evenly into the prepared crust and smooth the top with a spatula.
- Add topping: Crush the remaining Butterfinger bar and sprinkle it uniformly over the top of the pie for extra crunch and decorative appeal.
- Chill: Refrigerate the pie for at least 4 hours or preferably overnight to allow it to set properly.
- Serve: When ready, slice the chilled pie and enjoy. For cleaner slices, dip your knife in hot water and wipe it dry before each cut.
Notes
- For best results, ensure the cream cheese is softened to avoid lumps in the filling.
- To crush Butterfingers easily, place them in a zip-top bag and crush with a rolling pin.
- Use a piping bag to add whipped cream swirls along the edge before applying extra Butterfinger pieces for an elevated presentation.
- This pie can be made up to 2 days in advance; keep covered in the refrigerator.
- For clean slicing, warm and dry your knife between cuts to prevent sticking.
- High-quality peanut butter enhances the flavor significantly.
Keywords: Butterfinger Pie with Peanut Butter, no-bake pie, peanut butter dessert, Butterfinger candy dessert, creamy peanut butter pie