Artisan Bread
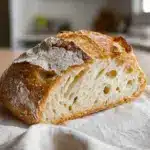
This artisan bread recipe yields a crusty, golden loaf with a chewy, flavorful crumb—perfect for sandwiches, toast, or accompanying your favorite meals. Made simply with flour, yeast, salt, and water, it requires minimal hands-on time but benefits from a long, slow rise to develop its signature taste and texture.
- Prep Time: 10 minutes
- Cook Time: 30 minutes
- Total Time: 2 to 10 hours rising plus 40 minutes (including baking and cooling)
- Yield: 1 large loaf or 2 smaller loaves 1x
- Category: Bread
- Method: Baking
- Cuisine: American/European Artisan
- Diet: Vegetarian
Ingredients
Scale
Main Ingredients
- 3 cups (395 grams) all-purpose flour or bread flour
- ½ tablespoon kosher salt
- ¼ ounce instant or active dry yeast packet (or 2 ¼ teaspoons)
- 1 ½ cups warm water (105°F)
Instructions
- Mix Dry Ingredients: In a large bowl, combine the flour, kosher salt, and yeast thoroughly to ensure even distribution.
- Add Water and Combine: Pour the warm water (ideally 105°F) over the dry ingredients and mix until the mixture forms a sticky but manageable dough.
- First Rise: Cover the bowl with a towel or plastic wrap and let the dough rise at room temperature for 2 to 10 hours, or preferably overnight to enhance the flavor and texture.
- Shape the Loaf: After rising, wet your hands to prevent sticking, then turn the dough onto a lightly floured surface. Gently fold the edges into the center to form a round loaf or divide the dough into two smaller loaves, tucking the ends underneath to create tension.
- Second Rest: Place the shaped dough on parchment paper. Dust the top with flour and score 1 to 4 shallow lines across the surface with a bread knife to allow for expansion during baking. Let it rest for 20 to 30 minutes.
- Preheat Oven: Preheat your oven to 450°F, positioning a baking stone, pizza stone, Dutch oven, or an iron skillet inside to heat thoroughly.
- Create Steam and Bake: Slide the dough on its parchment paper onto the preheated hot surface. Add 1 cup of hot water or 5 ice cubes to the bottom of the oven to create steam, which helps develop a crustier crust. Close the oven quickly to trap steam.
- Bake the Bread: Bake for 25 to 30 minutes, until the loaf is golden brown and crusty.
- Cool: Remove the bread from the oven and cool on a wire rack for at least 30 minutes before slicing to allow the crumb to set properly.
- Storage: Store the bread in a paper bag at room temperature to help maintain crust crispness while preventing moisture buildup.
Notes
- Using bread flour will result in a chewier texture due to higher protein content compared to all-purpose flour.
- Longer rising times improve flavor and texture; overnight rise is ideal.
- Scoring the dough helps control expansion and contributes to the classic artisan look.
- Adding steam during baking is critical to developing a crisp, crackly crust.
- Allow bread to cool fully before slicing to avoid gummy texture.
- Store in paper bags rather than plastic to maintain crustiness.
Nutrition
- Serving Size: 1 slice (about 56 grams)
- Calories: 150
- Sugar: 0.1 g
- Sodium: 230 mg
- Fat: 1 g
- Saturated Fat: 0.1 g
- Unsaturated Fat: 0.5 g
- Trans Fat: 0 g
- Carbohydrates: 30 g
- Fiber: 1.5 g
- Protein: 5 g
- Cholesterol: 0 mg
Keywords: artisan bread, homemade bread, crusty bread, easy bread recipe, no-knead bread, bread baking
Find it online: https://liamjayne.com/artisan-bread/